
Sourdon't 2.0: A Recipe!

Two Pumpkin-Pumpkin Sourdough loaves
It’s been two years since I wrote Sourdon’t. Back then, I was a bread-baking neophyte with a lot of heart and no experience, traumatized after one too many empty recipe promises and baking disasters. Two years later, I can’t claim to be an expert, but I am older and wiser—and, more importantly, so is my starter.

Sourdough starter, ready to go!
I’ve realized that my biggest problem back then (besides…y’know, the pandemic) was an immature sourdough starter. Born in New York City at the height of the pandemic, my starter just wasn’t ready to make bread. A little over two years later, she’s grow up a lot, journeying with me to San Francisco, Vancouver, New York, and back. She rises like clock work, and makes some damn good bread. Airy, crusty, and flavorful—these loaves could give Tartine a run for their money.
Even the best sourdough recipe can only get you so far. If cooking is an art and baking is a science, bread-making is straight up alchemy. Turning flour, water, and salt into edible gold requires a hefty dose of magic, and variables as subtle as the strength of your starter, the temperature of your kitchen, the protein content of your flour, the seal on your Dutch oven, etc. can yield wildly different results.
But I’ve learned that this is half the fun. Tinkering with these variables is a maddening, addictive adventure, a bit like how I imagine Harley-Davidson owners can spend a lifetime customizing their ride, searching for that mythical golden flange, or whatnot. That said, I’ve been asked to share a recipe for this ridiculously good pumpkin sourdough I made recently, and I like to give the people what they want! I’ve tried to structure it the way I would have wanted a recipe when I was a total beginner. The crumb is moist and tender, deliciously pumpkin-y without tasting like a faceful of autumn. Try it!
Just don’t say I didn’t warn you.
p.s. If you’re making this and don’t have a mature sourdough starter, try asking at your favorite bakery, order this from King Arthur, or let me know. I will happily mail you some of mine!
p.p.s. A note on timing: Making sourdough takes at least a whole day and night from start to finish. You’ll only really be actively working on it for about 40-60 minutes collectively, but you need to be present for most of the evening to get those coil folds in. If I kick off this process by mixing the leaven around 8am, I usually finish shaping the loaves around 10pm and can bake them anytime the next day, or even the day after.
Pumpkin-Pumpkin Sourdough
Makes 2 loaves • Adapted from a recipe by Full Proof Baking
Ingredients
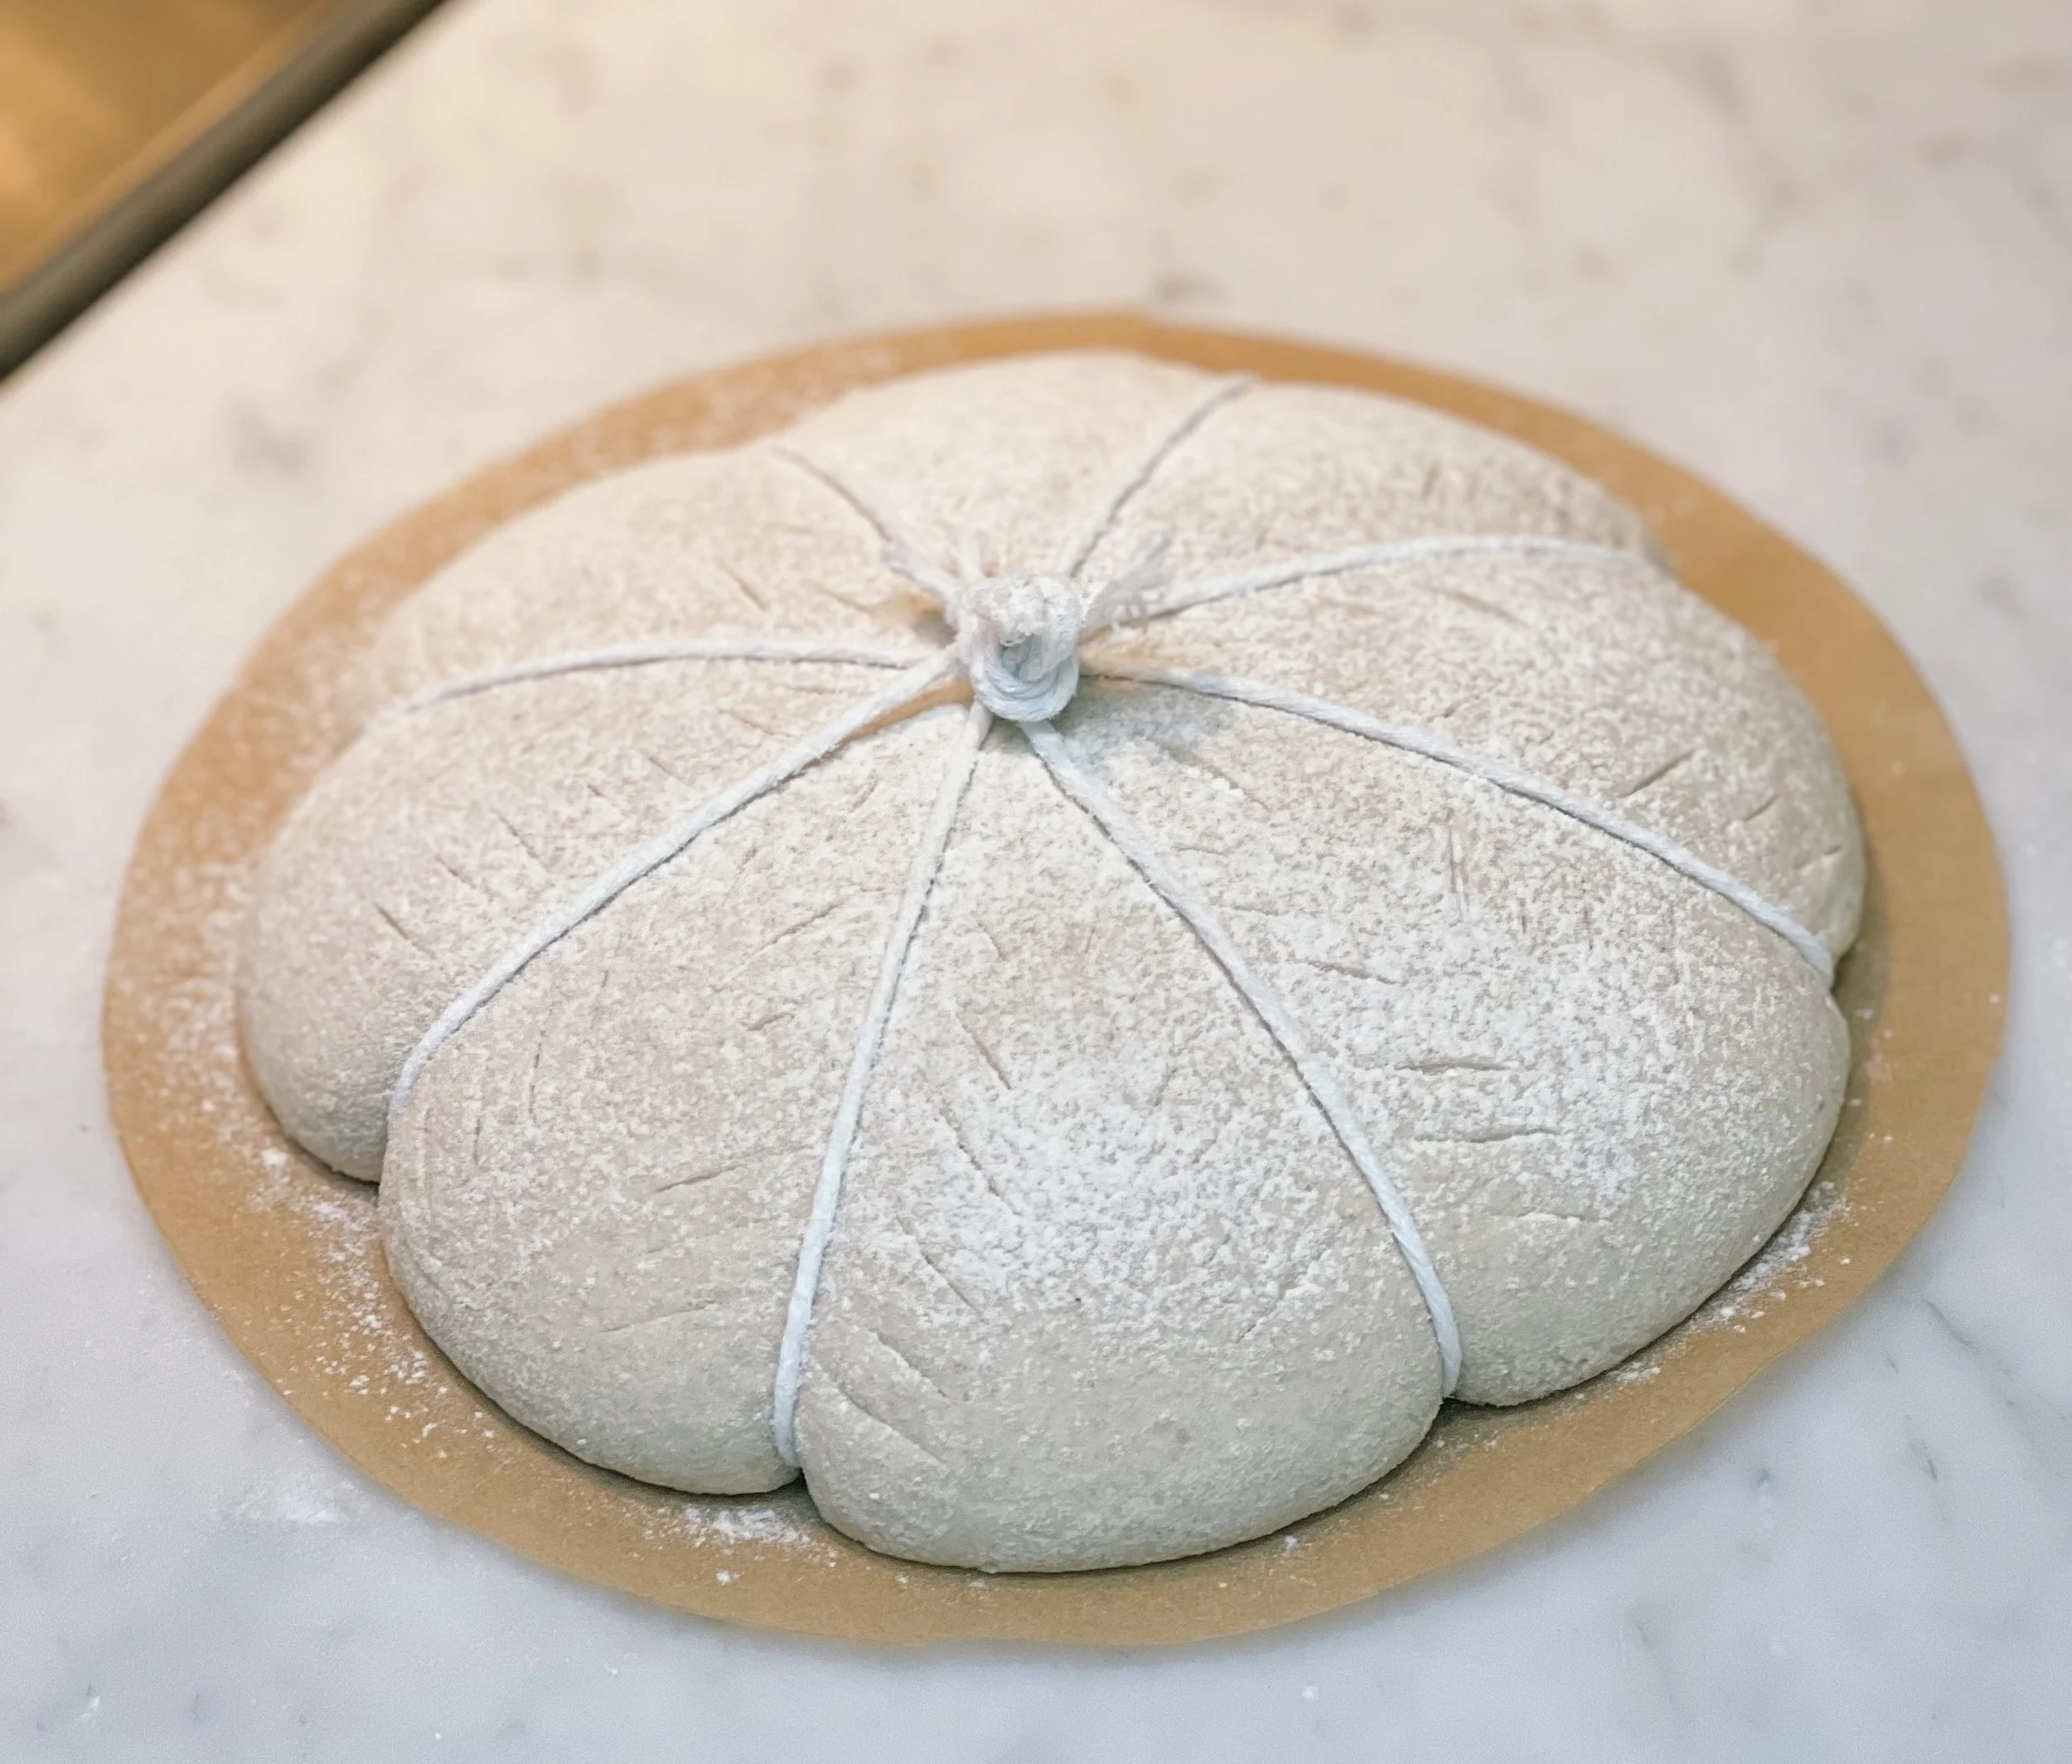
Bread dough tied into a pumpkin shape with string
30g active sourdough starter, 100% hydration, fed the night before
570g bread flour (I usually use Giusto’s Organic Ultimate Performer High Protein flour)
590g water at room temperature (about 20-23°C or 70-75°F)
15-22g fine sea salt
140g pumpkin puree
1 tsp cinnamon
~1/2 cup all-purpose flour, for dusting
2 tbsp canola oil
Equipment
Medium jar for levain
Large bowl
2 dish towels
Kitchen scale
Silicone spatula
Bench scraper
2 round bannetons (mine are 7” with linen liners)
2 plastic bags
2 Dutch ovens with lids
2 parchment paper rounds (cut 8-9” in diameter)
8 pieces of butcher’s twine, each 24” long
1 razor blade or baker’s lame
Leaven, or Levain (if ya fancy)
30g active sourdough starter
60g bread flour
60g waterTo get my starter ready for prime time, I make sure to feed it once a day for a few days prior. Think of it as a pregame workout regimen. I don’t bake a ton of bread constantly so I keep my starter relatively small to avoid waste. My feed normally goes: 20g starter + 20g bread flour + 20g water; in bread-speak this is called a 1:1:1 ratio.
Make the “levain” using active sourdough starter, fed to a ratio of 1:2:2. This will jumpstart the fermentation of your bread. Mix this up in a medium glass jar early in the morning, leveling off the top and marking it with a line so you can keep track of how it’s growing. Cover and let this rise until it triples (about 5 hours).
In the meantime, you will autolyse (basically, hydrate) your flour so that its gluten structure starts to develop and it’s ready to go around the same time as your levain.
Autolyse
510g Bread flour
60g Whole wheat flour
80g Spelt flour (I find the spelt adds a nice flavor but you can also just do 140g of whole wheat)
540g water at room temperature (normally I do an 85% hydration dough, but because the pumpkin adds quite a bit of moisture, I’ve lowered the amount of water so that the dough stays manageable)Stir the flours together first, add the water and mix until there is no dry flour left. I use a silicone spatula because the dough doesn’t stick to it. Cover this with a damp towel and let it hang out until your levain is ready.
Making Dough
Mix the levain into your hydrated flour until fully incorporated. Cover with damp cloth and rest for about 30 minutes.
Add salt
I like my bread on the salty end, but this is really up to your taste. Sprinkle the sea salt over the surface of your dough, then mix using a spatula or damp hand until fully incorporated. Cover and rest for 30 minutes.
Add Pumpkin, Stretch and Fold
Mix the cinnamon and pumpkin together in a small bowl.
Using your hands, take a scoop of pumpkin and spread it over the surface of the dough. Pick up the dough from the back of your bowl, stretch it upwards and fold over itself towards your body. Give the bowl a quarter turn and repeat until you’ve added all of the pumpkin. The pumpkin is meant to be slightly streaky, so don’t worry if it’s not fully blended in. The folds you’ll do during bulk fermentation will incorporate it further.
Lamination
This technique is borrowed from pastry chefs and is not normally something you’d do with sourdough. If you were making croissants, for example, lamination is the step that adds all those gorgeous layers of butter. Here, I find that it adds structure and openness to the final loaves. Feel free to skip if you want! For a video tutorial, check out the masterful Full Proof Baking.
To laminate, wet an approximately 18x13” area of your counter top (either by misting, or just using your hands to smush the water around). ‘Pour’ your dough out onto the counter, using a spatula to help release it from the bowl. With damp hands, get underneath the dough and gently stretch from the center outwards, until you’ve formed a large rectangle of roughly even thickness. If the gluten has developed properly this should be relatively easy to do without tearing.
Do a letter fold: pretend you’re folding a brochure, fold the lefthand third of the dough over the middle third, then the righthand third over the middle. Pop any large air bubbles. Next, fold the top third of the dough onto the middle, followed by the the bottom third. You should have a neat envelope of dough. Transfer back to your bowl. Cover and let rest for 45 minutes.
Bulk Fermentation, with Coil Folds
Coil folds build up the strength of the gluten. The length of this stage depends a lot on how your dough is behaving. I typically do 3 complete coil folds with a 45-minute rest between each, with a final rest of about 1.5-2 hours. If your dough feels very loosey-goosey and unstructured, you may need to add another 1-2 coil folds.
To do a coil fold, wet your fingers and slide them underneath the center of your dough. Lift and pull up until the edge near you detaches from the bowl, let it fold under the section you’re holding.
Next, lift the whole ball again, this time until the back edge detaches and you can fold that under. Give the bowl a quarter turn, then repeat the two folds. Cover and let it rest. Bulk usually goes:
Coil fold 1, rest 45 minutes
Coil fold 2, rest 45 minutes
Coil fold 3, rest 1.5–2 hours
Pre-Shaping
When your dough is ready to shape, it’ll feel delicately puffy and alive. Shaping a sourdough boule takes practice! You’re trying to create some surface tension so that your loaf will achieve good oven spring. Handle sourdough very gently but decisively—this is not a yeasted bread that you can punch down and manhandle. FYI my favorite shaping tutorial is Sarah Owens’!
To pre-shape, lightly dust your work surface with all purpose flour, dust the bottom edge of your dough, and ‘pour’ it into the center of your surface.
Using a lightly floured bench scraper, divide the dough equally into halves, nudge these apart.
With lightly floured fingers and your bench scraper if needed, perform two letter folds (fold the top third down, bottom third up; left third center, right third center). Do this to both balls of dough. You can let these rest seam-side down for 10 minutes, but I’ll be honest, I’m usually impatient at this point and jump straight into the final shaping!
While you wait, prep your bannetons by dusting them evenly and liberally with flour.
Final Shaping
On a lightly floured work surface, use your bench scraper to help you flip your dough back over, tug the top down, then stitch the sides in toward the middle until it looks a bit like a mummy. From the bottom, use your thumbs to help roll this up toward the top, until you have a relatively snug roll, sitting with the seam on the bottom. Pinch together the side seams to seal them.
Dust each ball of dough liberally with flour, then pick it up, turn it over, and gently plop it into your bannetons, seam-side up.
I cover these with a clean cloth or even paper towel and then encase in plastic.
Proof and Retard
Let the loaves rest at room temperature for 15-20 minutes.
Place them in the refrigerator for at least 8 hours (for me this means overnight). This cold retard step allows the dough to ferment very slowly. You can even wait until the morning of the third day to bake. The longer it rests, the more digestible it becomes (for the gluten-sensitive, this is good), and also the tangier it gets, as ascetic acid builds up.
Preheat
When you’re ready to bake, place two dutch ovens in the middle of the oven and preheat it to 500°F. I turn the fan on because my oven doesn’t heat evenly enough. Preheat this way for one hour.
Meanwhile, prepare eight pieces of cotton twine, cutting them to 24” and lightly running them through canola oil. Squeeze out any excess oil, and arrange 4 pieces over the parchment round, so that each round appears to have eight equal sections.
Score
I work with one loaf at a time because the colder the dough stays, the easier it is to score. Take banneton out of the fridge, dust the top of the dough with all purpose flour, and gently flip it over onto the parchment round and twine. You may want to flip it onto a floured hand first, before transferring onto the parchment so that you can center it and the strings don’t move too much.
Working pretty quickly, tie the ends of each string in the center of the loaf, snipping off any excess. You want these to be snug over the dough, but not so tight they cut into the loaf. Dust the loaf surface with all purpose flour and use your razor blade to score it in whatever pattern you wish.
Repeat with the other loaf.
Bake
When your loaves are ready, take out the hot dutch ovens and place one loaf in each by grabbing opposite edges of the parchment round and lowering the loaf into the pot gently. Put the lid on immediately.Be very careful! The dutch ovens are as hot as the surface of the sun, and I find I can’t grasp the parchment with oven mitts on, so I’m always reminding myself not to rush and sear my hands here.
Bake for 25 minutes at 500°F.
Remove the dutch oven lids, turn the fan off, and continue baking for 12-15 minutes at 450°F.
Cool
After removing your loaves from the oven, snip off the knots and remove each piece of twine. With the smell of pumpkin and spice filling your kitchen, it’ll be very tempting to slice into your bread immediately. Don’t do it! Sourdough is actually best when it’s had some time to cool. Wait an hour (or as long as you can) and then go for it! Smother it in whipped honey butter, dunk it in your TikTok-approved butter candle, choose your own adventure! And let me know how it goes :)Keep scrolling for the finale.
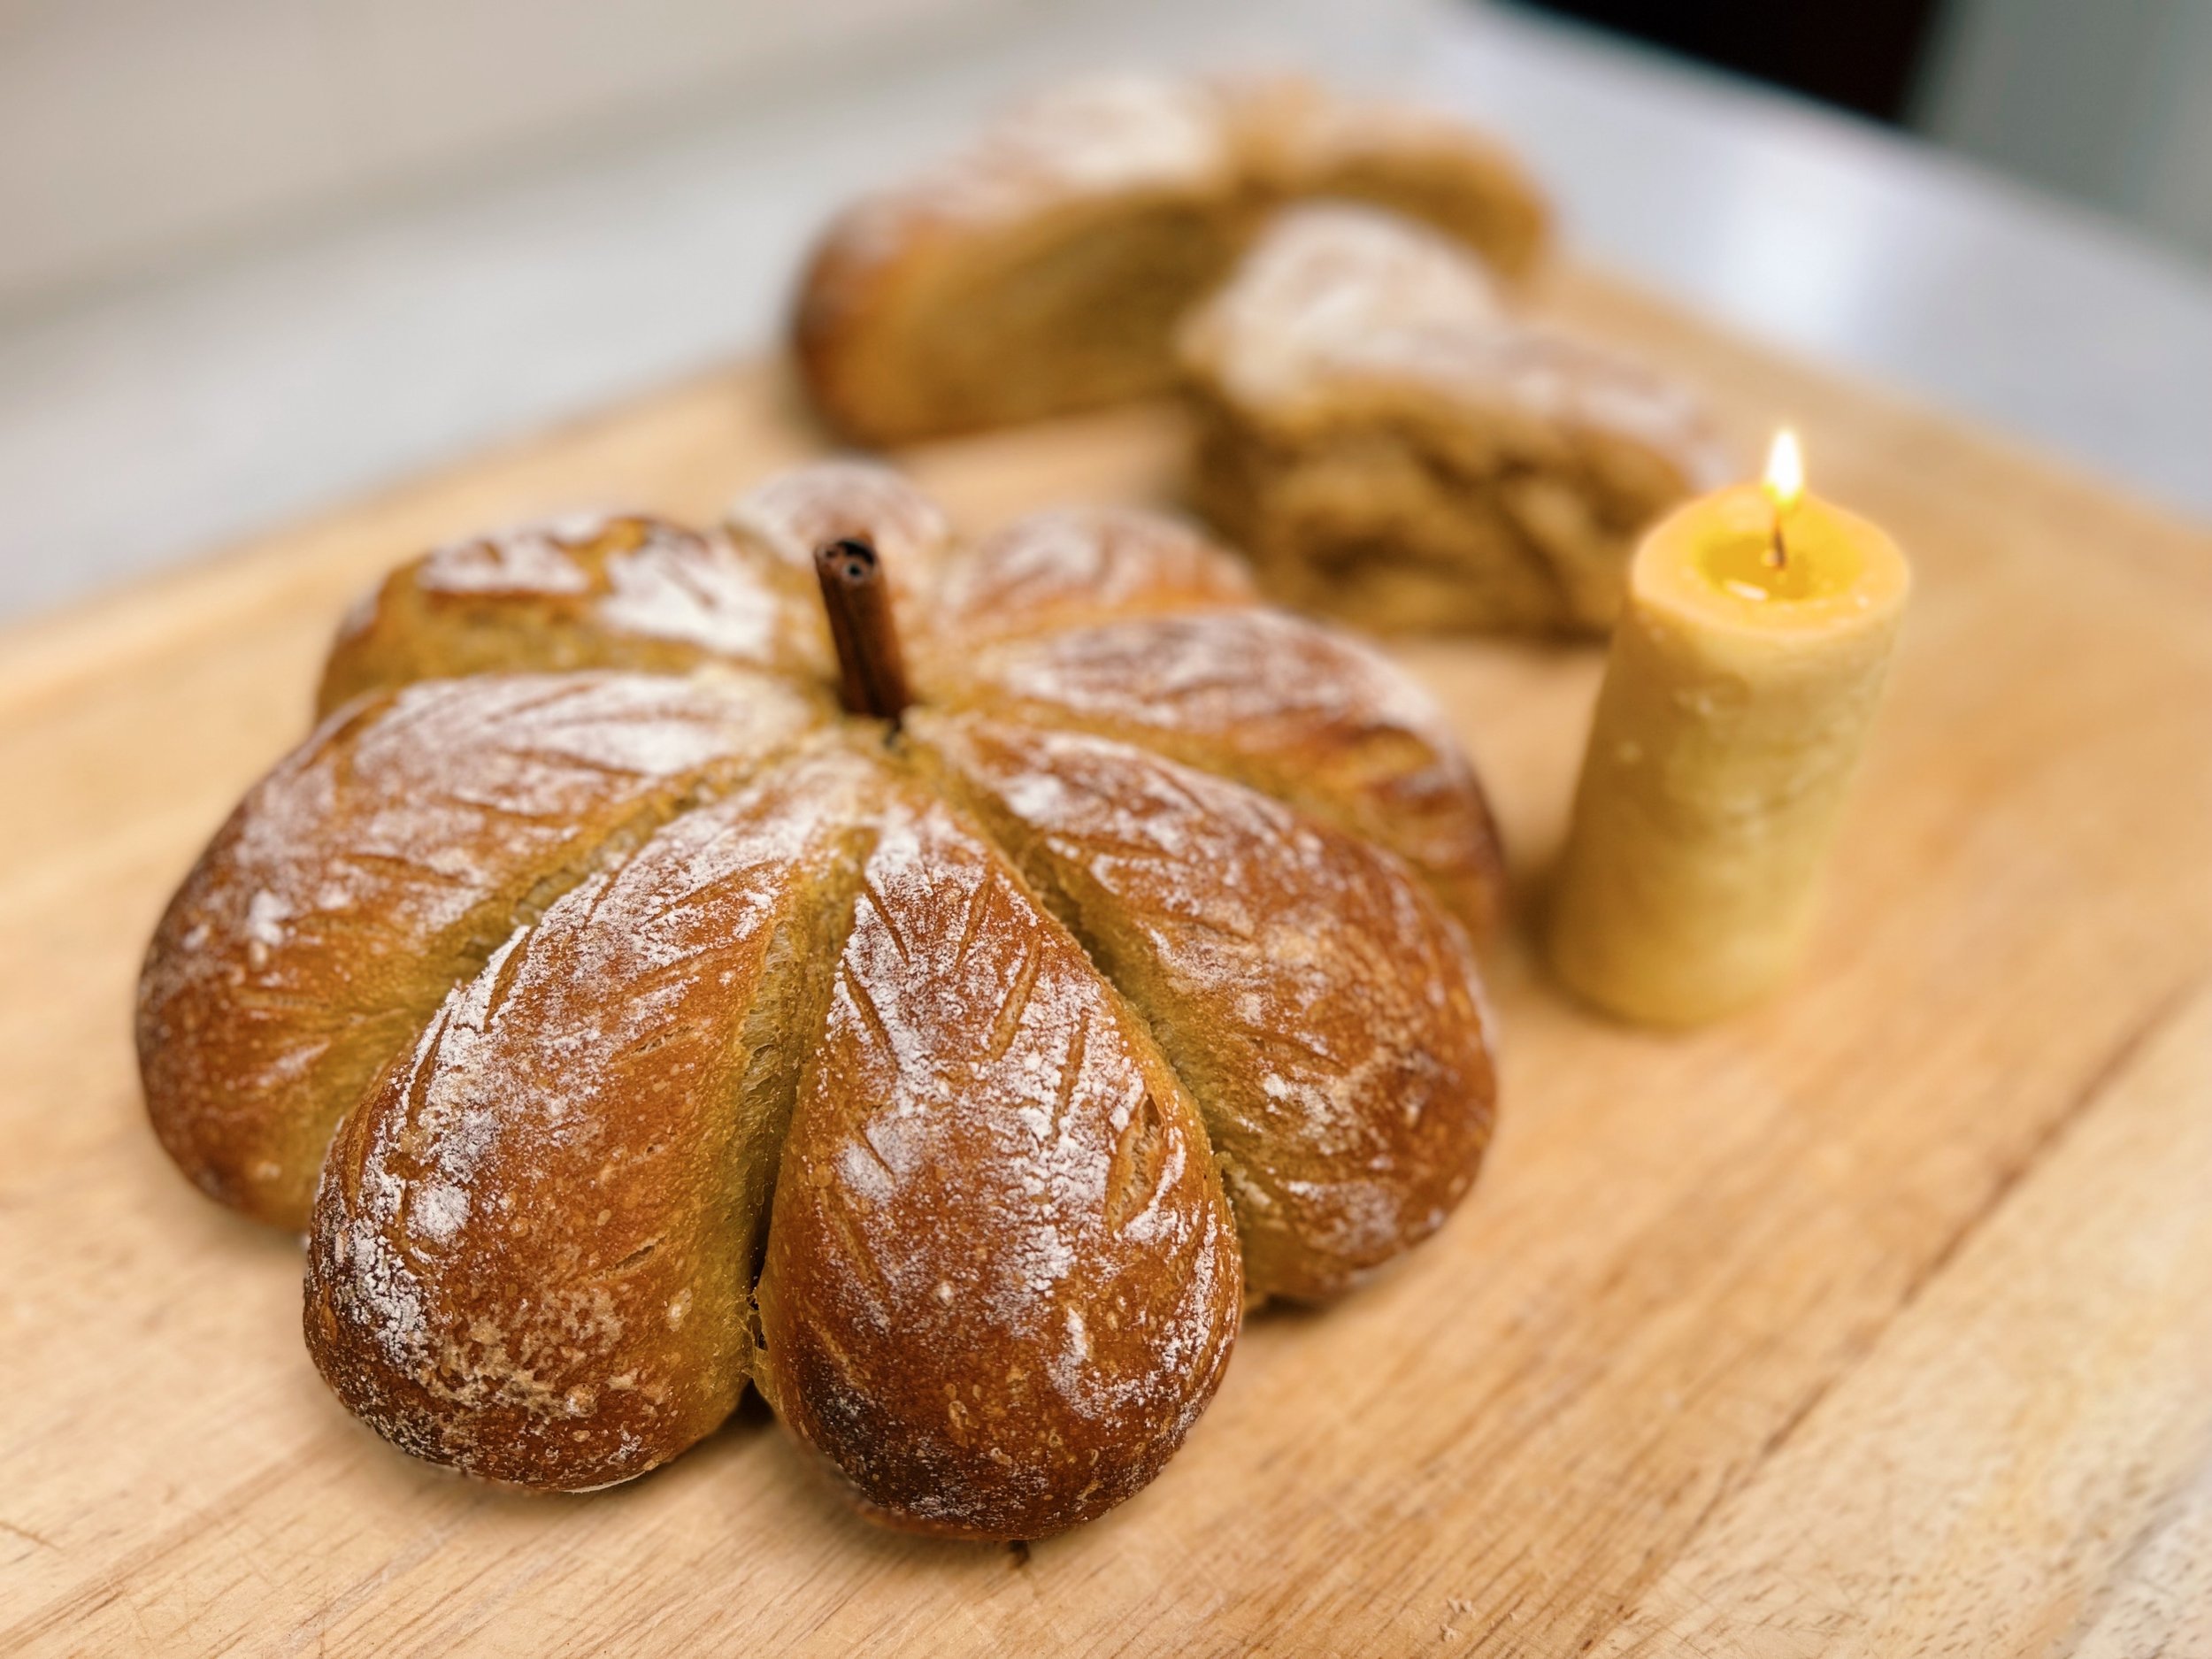
Pumpkin sourdough loaves with a butter candle
Vote
In Cooking in Captivity tradition, I always include a cause to support at the end of each recipe. Today’s is simple. The Midterm Election is in one week, and it could not be more crucial. Not only is control of Congress at stake, but the fate of American democracy could be decided through many down-ballot local races. No matter where you live, please exercise your right to vote—early if possible—and encourage your friends and family to do the same.

Even if you live somewhere where the results seem predictable, your vote matters! Even the liberal bastion of New York is at risk of going red at the state level, for example. If that sounds bad to you, please don’t take your vote for granted.
And if you want to go a step further, here are five extremely close key senate races you can still donate to:
Georgia - Raphael Warnock v. Herschel Walker
Pennsylvania - John Fetterman v. Dr. Oz
Wisconsin - Mandela Barnes v. Ron Johnson
Ohio - Tim Ryan v. JD Vance
Nevada - Catherine Cortez Masto v. Adam Laxalt
N.B. I’m not telling you who to support, I’m just saying if you support the Republican candidates, you can figure out how yourself.